
 9435
9435
The Event Settings options allow you to configure the defaults to be used for your events. Setting up the defaults will save you time when creating events, and may be over-ridden as needed for individual events.
- Select Setup in the Navigation panel.
- Click Event Settings in the Event section.
- On the Event Settings screen, you may configure the following to be the default for the events that you will set up:

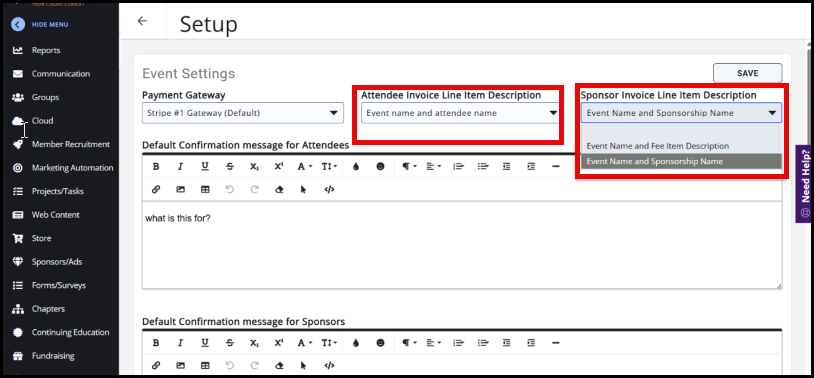
- Payment Gateway - Select the payment gateway you wish to use by default for your events. (Requires Integrated Payment Processing)
- Invoice Line Item Description Option - Select what you would like to be included in the invoice line items. Below includes a picture of all possible line items.
- Default Confirmation message for Attendees - Enter the confirmation that you would like displayed to registrants after they have completed their registration. This confirmation message is also included in the Registration Confirmation email.
- Default Confirmation message for Sponsors - Enter the confirmation that you would like displayed to a sponsor after they have completed their registration. This confirmation message is also included in the Registration Confirmation email.
- Default Contact For Event Approval Tasks - Select the individual who will be responsible for approving events submitted from the website or the Info Hub.
- Default Calendar - You can select a default calendar on which you'd prefer your events to appear. This can be changed if needed when setting up new events.
- Options:
- Display Registration Descriptions by Default - Select this option if you wish to display the full description of a registration fee on the event registration page. If the setting is not enabled, then only the first line of the description displays but includes a visual indicator to let the registrant know that clicking it will display more, as shown below.

- Enable Individual Custom Fields on Registration Form - Select this option if you wish to include individual custom fields on your event registration pages. Data entered into these fields during the registration process will then tie back to the contacts (if they exist) in your database and will display on the "More Info" tab, and are usually able to be used in merge fields for emails and certificate templates.
- Display Associated Individuals Upon Email Match - This setting determines whether individuals on an event registration form can view other individuals at their company after confirming their identity via e-mail address only. The setting is off by default. When enabled, anyone could enter the email address for one person at the company and view information for other employees at that company as well.
- Display Registration Descriptions by Default - Select this option if you wish to display the full description of a registration fee on the event registration page. If the setting is not enabled, then only the first line of the description displays but includes a visual indicator to let the registrant know that clicking it will display more, as shown below.
- No Show Fees: See Set up "No Show Fees" for Your Events for more details.
- Charge No Show Fee on Subsequent Registration - enable this option if you wish to charge attendees who register for an event, do not cancel their registration, and do not attend a "penalty" fee, to be assessed on their next event registration.
- Event Category Item - events with this category assigned will assess a no show fee. You can have multiple categories for differing no show fees, but should use only one category per event.
- Saleable Item - this is the good/service item that will be added to the next registration.
- Price - you can customize the no show fee amount if needed.
- Days to Lookback for Prior No Show - the system will look back over registrations/attendance within the window specified. NOTE: once a no show fee has been assessed for an event, it will not be assessed again.
- No Show Policy - if you are enacting a no show fee, we recommend you enter a No Show Policy so attendees are aware that by not attending they may incur a fee on their registration.
- Click Save in the upper right corner to save your changes.
Import Events from an iCal Feed
GrowthZone Event Calendars can be automatically populated via an iCal feed by a .ics calendar file. This gives associations an automatic way to populate their GZ event calendar with events from another provider. The iCal URL selection creates a field for you to enter your iCal URL; once saved, it imports the events into GZ and makes them immediately available on the selected public calendar.
Use Case Scenario
An association may have a 3rd party that provides its education events, for example. Instead of manually adding those to their GZ calendar, they can use an iCal feed from their 3rd party and add it to GZ so it populates every night with the 3rd party's events.
Where to find
- Under Setup, go to Event Settings.
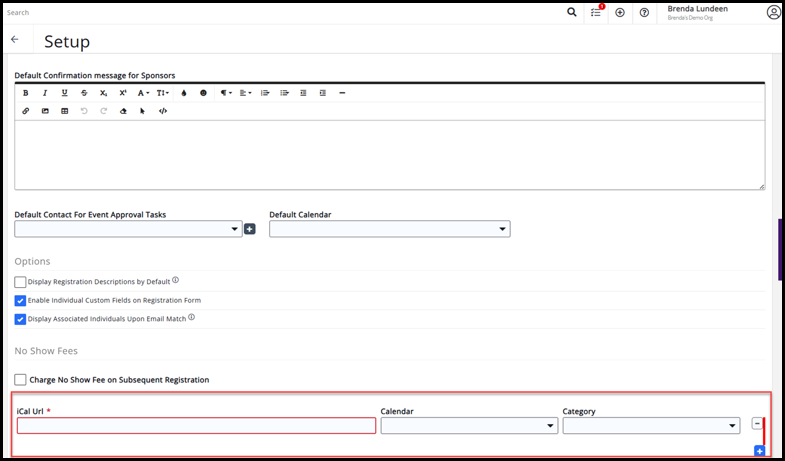
- Scroll to the bottom of the page to find the iCal URL.
- Populate the iCal URL, Calendar, and Category where these events will display.
-
Once the iCal (.ics) file is saved to the iCal URL and a calendar and category are selected, click Save in the top-right corner of the page.
 Important Details
-
GrowthZone event calendar will be populated each night (~2:30 am CT). Any new event added to the feed will be added overnight. Existing events will be updated with any updates added to the original feed.
-
The events will appear in the customers' event calendar with the designated category.
-
All events are populated with any events in the feed that have today’s date and forward.
-
All events are active and will show on the selected calendar immediately after import.
-
Any past events will never be modified by the event feed. You can add/modify those events whenever/however you wish.
-
Events in the future that are populated from the event feed should only be modified with the understanding that fields populated automatically may be overwritten by the iCal feed each night. i.e., Event Name, Description, Date/Time, etc. Modifications to other fields will “stick”; i.e., adding a CE component, registration types, or attendees will not be overwritten.
-
To keep the feed updating each night, the iCal Feed URL must remain under Event Settings.
-
Do not delete the calendar or the category that are set up to be imported into. Check under Setup > Event Settings for the iCal URL entry to see which calendar and category are set up to receive the events.
-
The iCal feed does not delete events, so if there is a change needed on what has already been imported, i.e., a different calendar or category, the feed only knows how to import again to the newly selected location. It would need manual cleanup to change what had already been imported.
Related Articles
Configure Default Finance Settings
Allow Invoicing for Event Registration

