.png)

 1810
1810
Introduction
Your association may wish to offer tiered membership dues so that members can select a membership that is more meaningful to them and you can generate additional revenue. In order to do so, with the Benefit Tracking module, you are able to tie benefits to memberships and easily track and report on their usage. This will allow you to easily demonstrate member value so that your members renew.
Tracking Sponsorships and Affiliate benefits may also be accomplished using the Benefit Tracking module if those benefits are associated with a membership.
Interested in purchasing the Benefit Tracking Module? Reach out to [email protected]
Complete the following steps to implement benefit tracking:
- Set up Benefit Discount Types
- Create Benefit Discounts
- Create Benefit Items
- Create Benefit Packages
- Tie Benefit Packages to Membership
- (Optional) Tie Benefits to Event Registrations
Set up Benefit Discount Types
Discount types are used as a way of categorizing, filtering and reporting on discounts that you may offer towards memberships, events, etc. The type will also drive where discount types can be using in the software. In order for you to setup discounts for your benefits you will first create a discount type "of type" Benefit Tracking.
- Click Setup in the left-hand navigation panel.
- Click Discount Types in the Finance section.
- On the Discount Types screen click the Add button.

- On the Enter a Name for the discount type.
- Enter a Description for the discount type.
- Select the Discount Account that should be used for this discount type. A discount will result in a debit to this account.
- Select the Deferred Discount Account that should be used for this discount type, if this discount is used for a deferred revenue item.
- Select Benefit tracking from the Discount Type list. This selection will ensure the discount type is available to you when you set up your benefit items. .
- Select the Fee Item that this discount will be used for.
- Click Done.
Create Benefit Discounts
The Benefit Discounts allow you to configure the actual discounts that can be used when creating your Benefit Items. You can create as many Benefit Discounts as necessary. Perhaps, for an event, you have a benefit package that offers a 25% discount and another that offers a 50% discount and so on. You can pro-actively create these discounts, or you will be able to create discounts "on the fly" when the need arises.
- Click Setup in the left-hand navigation panel.
- Click Discounts in the Finance section. A list of all discounts you have currently setup will be displayed.
- Click the Add button.

- Enter a Name for the discount. Both the name of the discount and the description will be displayed on the invoice.
- Enter a Description for the discount. Both the name of the discount and the description will be displayed on the invoice.
- Select the previously created Benefit Discount Type from the list.
- Select Discount Percent as the discounting methodology:
- Can Be Used With Other Discounts: Enable this option if this discount can be used along with other discounts.

- Click Done.
Create Benefit Items
Prior to building benefit packages you create the benefit items to be included in those packages. For example: benefits for a particular membership include registrations to the golf tournament, one banner ad, and use of the conference room. You will create each of these benefit items then bundle the together in a benefit package.
- Click Setup in the left-hand navigation panel.
- Click Benefit Tracking in the Memberships section.
- On the Benefit Items tab click Add Benefit Item.

- Provide a Name for the benefit item. The name will be displayed on reports and member facing information. Best practice is to use a name that clearly points out what the benefit item is for. For example: If this benefit should go towards a golf registration include the name of the event.
- Provide a Description of the benefit item (Optional). Currently visible only internally
- Choose the Benefit Type.
- For event discount choose Event Registration:
- Discount: Select a discount that you created under Setup>Discounts to indicate the discount amount (free, 50% off etc) that will be applied when someone uses this Benefit Item.
-
Allow Use By: This selection only applies to benefits that are owned by an office/business.
-
Primary Individual only: or if only the primary contact/agent should be allowed to get the benefit.
-
All Individuals of the Business: Select if this event discount should be used by all individuals/agents of a business/office.
-
-
Custom: Select Custom when when you will define the details of the benefit item to exactly what you want. Your staff will manually track and record the use and usage details.
- For event discount choose Event Registration:
- Enter the Value of the benefit item. This is the monetary value of this benefit item. This is an internal field only and is visible on internal reports.
- (Optional) Choose Category for this benefit item should display under in reports. It provides an easy way to filter the Benefit Item History or Benefit Usage Reports. See Categories for further instructions on creating your categories.
- Choose the Fee Item associated to the benefit item.
- If you have selected Event Registration as the Benefit Type choose from your previously created discounts from the Discount list. Only discounts setup of type Benefit Tracking will be available for selection.
- To make this benefit item available for benefit packages verify that Is Active checkbox is enabled. If you no longer wish to assign the benefit item clear this checkbox.
- Click Done.
Create Benefit Packages
Benefit packages allow you to group together a set of benefit items. You will then assign these packages to membership types so that your members are assigned benefits based on their membership. We recommend that you create a benefit package each year. You can easily do so by using the copy function.
- Click Setup in the left-hand navigation panel
- Click Benefit Tracking in the Membership section.
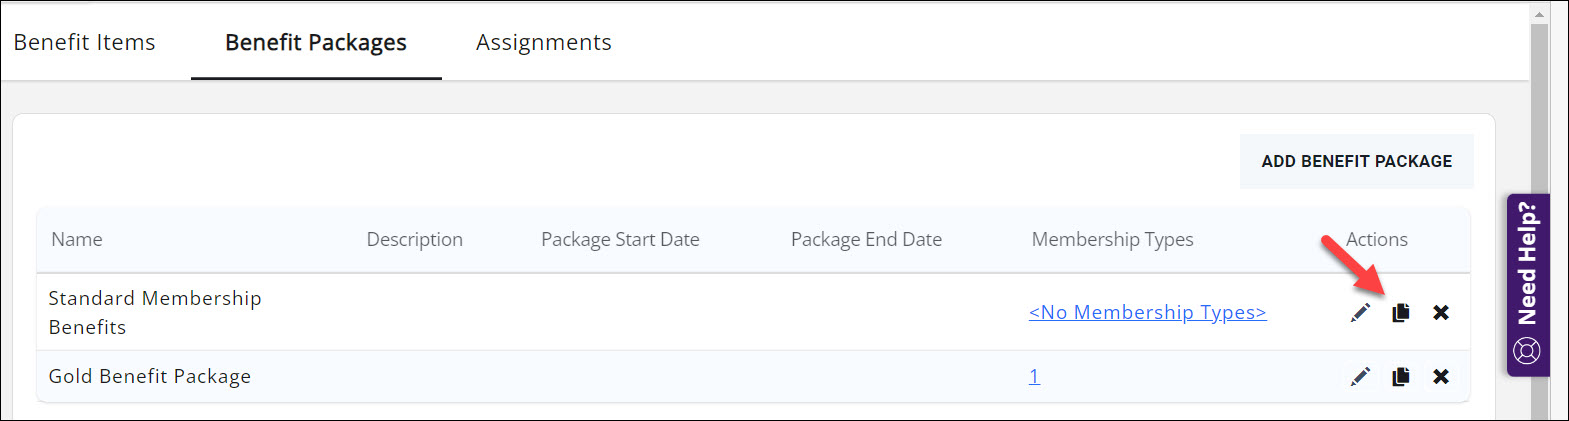
- Click the Benefit Packages tab. A list of all previously created Benefit Packages will be displayed.

- Click Add Benefit Package.
- On the Benefit Package screen:
- Provide a Name for the benefit package. If you are creating benefit packages for specific membership types you may wish to use the same name as the membership type. The name will display internally only.
- Provide a Description of the benefit package (this is only visible internally).
- Enter the package start and end dates. Package dates are looked at when a membership is approved and renewed.
-
For newly approved memberships: When a membership is approved, packages tied to that membership type that have a date range that includes the membership start date will be assigned.
-
Example: Champion Package Dates are 1/1/2023 - 12/31/2023. If my membership has a start date of 7/13/2023, the Champion package will be assigned when the membership is approved.
-
-
For renewed memberships: When a membership is renewed, packages tied to that membership type that have a date range that includes the start date of the renewal will be assigned.
-
Example:
-
Growth 2023 Package Dates are 1/1/2023 - 12/31/2023.
-
Growth 2024 Package Dates are 1/1/2024 - 12/31/2024.
-
If my membership is paid tickmark the benefits to include in this package.
-
-
-
- Update the Quantity of each benefit item to be included in this package.

- Click Done.
You can create as many packages as needed to suit your membership tier structure. A copy option is available so you can efficiently build out your packages.
Assign Benefit Packages to Membership Types or Membership Type Levels
By assigning Benefit Packages to Membership Types or Levels you ensure that your members are automatically given their benefits.
Assign to Membership Types
-
Click Setup in the left-hand navigation.
-
Click Types in the Memberships section.
-
For the desired membership click the quantity or the <No Benefit Packages> link in the Benefit Packages column.

-
On the Associate Benefit Package screen, click the checkbox for the package(s) you want to assign to this membership.

-
Click Done.
Assign to Membership Levels
In working with levels you have the option to assign individual benefits. benefit packages or both. Perhaps you create a base package then add additional benefit items based on levels.
-
Click Setup in the left-hand navigation.
-
Click Types in the Memberships section.
-
For the desired membership click the quantity link in the Levels column.

-
To add an individual benefit item, on the Edit Membership Levels screen, for each level click the link for the quantity or the <No Benefit Packages> link in the Benefit Packages column.

-
On the Associate Benefit Package screen choose the package(s) that you wish to add to this level.

-
Click Done. Repeat the steps above for each level.
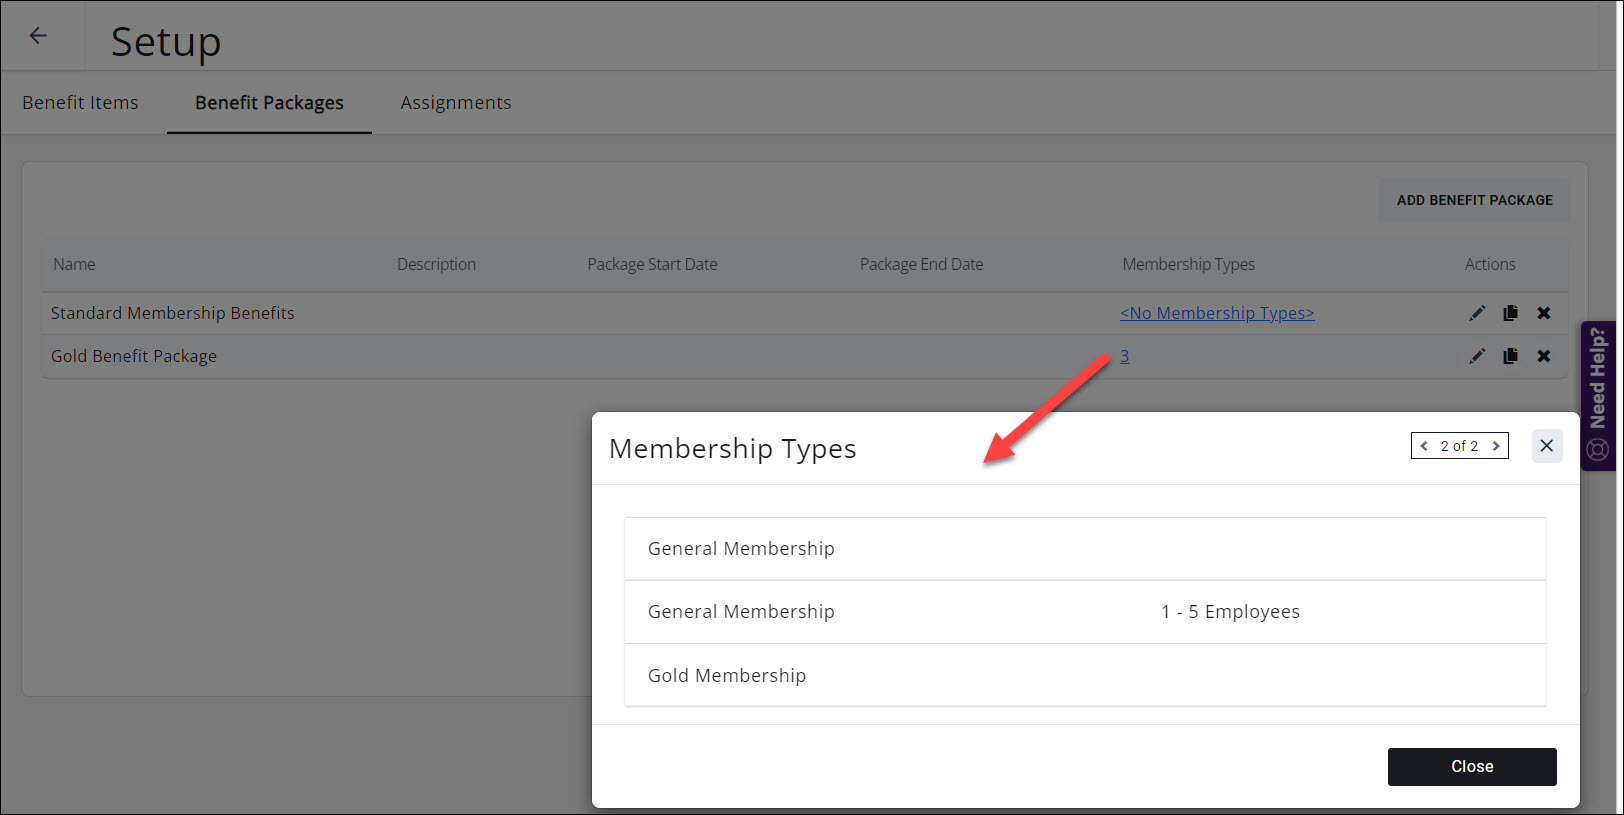
You can see which packages are assigned to which Membership Types: Setup > Benefit Tracking > Benefit Packages. Click the numbered link in the Membership Types column. On a go forward any newly activated memberships will automatically be assigned the appropriate package.
Assign Benefits to Existing Members
Now that you have tied benefits to a membership type, any new or renewing members will automatically be assigned the benefits. To retroactively assign benefits to existing members:
- Click Setup in the left-hand navigation panel.
- Click Benefit Tracking in the Membership section.
- Click the Assignments tab.
- On the Assignments tab you can filter to specific membership types (along with a variety of additional options). Once you have filtered the contacts, click Select All check box. A blue bar will appear at the bottom of the screen.

- Click the ASSIGN PACKAGES link.
- On the Assign Packages screen check-mark the package(s) you wish to assign.
- Click Done.
(Optional) Tie Benefits to Event Registrations
You can tie a benefit item to an event registration. With this set up the contact would automatically receive the benefit when registering for an event. See Assign Benefits to Event Registration types for further information.
Tracking Benefit Usage
Event type benefits will automatically be tracked by tying the benefit item to an event registration. See Assign Benefits to Event Registration types for further instructions. Custom benefits such as banner ads, use of conference room etc. will need to be manually tracked. This can be done individually on the contact's overview tab or in bulk in the Benefit Tracking module. Note: Benefits appear on the contact record of the benefit owner. For business memberships, the owner is the business contact (not the primary contact). So for business-owned benefits, make sure you look for the benefits on the business record.
Record Benefit Usage Individually
- Choose the contact's overview tab scroll to the Benefit Tracking section. This section provides you with an at a glance view into the contact's benefits usage. By clicking the
 you can filter to specific benefits, for example those that are still remaining.

- Track the usage of a benefit by clicking the record usage check mark.

- On the Add Record Benefit Usage screen:
- Enter the Usage Date the benefit was used. This will default to the current date.
- Enter the Usage Quantity use. This will default to one.
- Enter a Description. IMPORTANT! This description will display in reports but most importantly it can display to the member. Ensure that it is a description that you do wish the member to see.

- Click Done. The benefit usage is now recorded and visible on the contact's overview tab.
Record Benefit Usage in Bulk
If the use of a benefit item is all on the same date, for the same quantity and description, you can record the use for multiple contacts in mass.
-
Click Setup in the left-hand navigation panel.
-
Click Benefit Tracking in the Memberships section.
-
Click the Assignments tab.
-
Filter to the desired contact(s) (by using the
 or the
  ) or manually check the box in front of the contacts for which you want to record usage. The blue Action bar at the bottom of the table will appear.
-
Click Record Usage in the blue Action bar.
-
On the Record Benefit Usage screen filter to the benefit you wish to record.
-
The benefit usage date will be the current date.You can enter the quantity and description. IMPORTANT! This description will display in reports but most importantly it can display to the member. Ensure that it is a description that you do wish the member to see.
-
Click Done.
At times you may wish to add or remove benefits from a contact. For example, perhaps an event has been cancelled and you wish to remove that benefit and add a new benefit. These adjustment can either be made individually or in bulk.
Adjust Benefits Individually
- Choose the contact's overview tab scroll to the Benefit Tracking section. This section provides you with an at a glance view into the contact's benefits usage.
- Click the
 in the upper right hand corner of the section.

- On the Edit Remaining Benefit Items screen each item associated to this contact is displayed. Your remaining benefit items will be selected and remaining quantities displayed.
- Check mark the benefit items you wish to update. They will all be selected by default.
- Update the quantity of an item(s). You can either increase or decrease.
- Enter an Adjustment Description. IMPORTANT: The Description is part of what can be sent to the member to itemize how their benefits gave them advertising exposure, networking opportunities and other money-saving advantages.

- Click Done.
Adjust Benefits in Bulk
-
Click Setup in the left-hand navigation panel.
-
Click Benefit Tracking in the Memberships section.
-
Click the Assignments tab.
-
Filter to the desired contact(s) and select all or manually check the box in front of the contacts you for which you wish to record usage. The blue bar will be displayed.
-
Click Adjust Remaining.
-
On the Edit Adjust Remaining Quantity screen:
-
Select the Benefit Item that you wish to adjust
-
Enter the Adjustment Quantity which is the amount by which you wish to adjust.
-
Select the Adjustment Direction. This allows yu to adjust the benefit up or down based on the quantity entered above.
-
Enter an Adjustment Description. IMPORTANT: The Description is part of what can be sent to the member (if you choose to include it in your report) to itemize how their benefits gave them advertising exposure, networking opportunities and other money-saving advantages.

-
-
Click Done.
Communicate Benefit Usage to Contacts
Over time you will want to notify benefit owners of the benefits that their membership provided, how many they have used and what is remaining. This can be done individually or in bulk.
Communicate Benefit Usage to an Individual Contact
From a contact's overview tab you can send your member a benefit usage email. We have provided you with a default email template 'Your Membership Comes with Benefits'. This contains a powerful merge field Benefits Remaining Summary. You can use the template as it is designed, customize it or you can create your own. If creating your own be certain to include the merge field.
- On the contact's Overview tab scroll to the Benefit Tracking section.
- Click the email icon.

- The send email window will open, prepopulated with the 'Your Membership Comes with Benefits' email template. See Send an Individual Email for instructions on sending the email.
Communicate Benefit Usage to Contacts in Bulk
Within the Benefit Tracking module you will be able to send the benefits email to multiple members at one time.
- Click Setup in the left-hand navigation panel
- Click Benefit Tracking in the Memberships section
- Click the Assignment tab.
- Use the
 or the
  to filter to the desired contacts. For example, you may wish to filter by membership type if the email you wish to send varies from one membership type to another.
 - Once you have filtered to the desired contact you can select all by using the checkbox in the upper left-hand corner of the list or you can check contacts individually. When contacts are checked the blue action bar will be displayed.
- Click EMAIL OWNERS. The message will automatically be populated with the 'Your Membership Comes with Benefit' email template. You can use this as designed, customize it on the fly or select a template of your choice.
- See Send a Mass Email for further instructions.
There are two reports to help you find statistics needed to understand your member's use of benefits:
- Benefit History Report: Benefit Item History report provides a detailed way to look at every transaction that has happened with a contact.
- Benefit Usage Report: provides a list of those members who have used benefits (and which benefits) over a selected date range. You can filter it to a specific benefit item or category. This can be useful in analyzing which benefits your members use most.
Benefit Tracking Tips
Create and Use Benefit Item Categories
Benefit Items can be assigned to one or more benefit item categories. These categories can be created by you to organize your benefits further. Having your benefits categorized will provide a nice way to group your items in the Benefit Usage Report and the Benefit Item History Report.
To help you develop the category names, think about how you might want to analyze your benefit statistics.
Do you want to see all benefit items that are a particular type of benefit? i.e., Advertising benefits, Other Money-Saving discounts
Would grouping your benefit items by signature event be helpful? You could create a category for each of your five signature events (assuming there were multiple benefits available at each event).
The reports will give you subtotals per category for usage, value, and by transaction type, among other options. Read more about creating categories here.
Be Consistent and Mindful when Recording Adjustment Descriptions
Adjustments should always have a great description. The description is important. If you are consistent and conscious when recording usage to record the words that you want to share with your member, you’ll be glad you planned ahead.
The adjustment description that is available to your staff when they record a usage or change the remaining quantity etc. is something that can be included in reports and eventually as part of the data that can be sent to the benefit owner.
So being conscious of what is written in there - that it is a good, meaningful public description will be important.
Create New Benefit Packages Yearly
To keep your benefit offerings fresh and new, consider changing your benefit offerings each year in accordance with the needs and economic climate of your membership.
Use the Benefit Usage Report and summarize by Benefit Item, Membership Type, or Benefit Category to understand which benefits are less valuable than they once were or see which benefits have become more valuable to your members due to various external reasons.
You might be surprised that a small tweak to your benefit offerings each year, based on statistics, might give an edge to your retention percentage and increase revenue when you start offering benefits that are even more meaningful than last year’s benefits.
Set up your packages beforehand (make sure to set the Package dates for next year) and start prepping your new benefit packages. Remember, you can copy last year’s package as a starting point to save time and effort.
Benefit Tracking FAQ's
Does GrowthZone automatically prorate benefits if needed?
No. Assignment of a benefit package always assigns the full set of benefit items and quantities. There is no automatic proration of benefit items.
If proration is desired, staff will need to manually adjust the remaining quantities using the ability to adjust assigned benefit items.
What happens to existing benefit assignments if I modify a Benefit Package after it has been assigned?
If you need to go back and edit a benefit package, it will never affect existing benefit assignments. The only effect it will have is on new assignments going forward. If you wish to modify existing assignments, you would need to change those with an adjustment. You can do that manually, one at a time, or in mass via the Assignments tab. See Adjust Membership Benefits.
What happens to existing benefit assignments if I modify a Benefit Item after it has been assigned?
Editing a Benefit item will result in changes to existing benefit assignments. The details of a Benefit Item, such as the Allow Use By the Category, Value, or Discount, will apply to any existing assignments that are still remaining to be used.
Often times we expect that will be a good thing.
If you need the existing assignments to be kept as is and not be affected by the changes to the benefit item, you will need to create a new Benefit Item.
Do you have a way to set a benefit item at an Unlimited quantity?
No. At this time, we require a value in the quantity field and do not have an ‘unlimited’ option. If you set the value at 99, that might be the best workaround at this time.
What should I do if I have a benefit item that we no longer want to offer?
Edit that benefit item and remove the “Is Active' checkbox, which sets the item as inactive. Setting an item as inactive will remove the item from any existing packages and will no longer show that item as a possible item to be assigned.
Note this does not delete the item but keeps it visible in reports so that you can still want to see the item in reports to view the past history of the item.
The remaining quantities of an item that are already assigned will still be honored. They will display the word “(inactive)” appended when internal staff views their list of benefit items on a Contact.
Will benefit tracking work with both calendar year or anniversary renewal memberships?
Yes. Both types of membership renewals are supported. But please note that proration of benefits is not automatic if needed.
How do my members use their event benefits?
Once the benefit item is setup properly on the event, then the benefits are automatically given out to eligible registrants as long as they log in.
Benefits are never given out by authenticating with an email address only. That method of authenticating could be done by anyone since email addresses are publicly known.
IMPORTANT! Full Login to the Info Hub or login on the registration screen is the only way to use the free or reduced attendee registrations.
Which ticket is used first if I have two free event tickets to the same event?
Event registration is programmed to use up any shared benefits first, meaning that if the event benefit is assigned through a business contact and the event has “Allow Use by” of “All Individuals of a Business”, then that event ticket will be used first.
After that, we use the ones that expire first and then those that have the most quantity remaining.
If I have multiple benefit packages tied to a membership type and to a level of that membership, what benefits does the member get?
The member would get the combination of all appropriate benefit packages - the package(s) assigned at the membership type and any packages assigned to the membership level.
If my membership is a business membership, where do I record and track the benefits?
Business memberships are owned by the business, and thus the benefit tracking is also visible only on the business record.
Note that the primary contact, by default, can use event discounts, but the tracking is stored and viewed on the business contact.
Why does my Used column have so many ‘uses’?
The Used column on the Assignments tab and also on the Benefit Tracking widget on the Contacts>Overview tab both show the quantity that has been used 'all time; on these items, regardless of the date used.
So if a contact had the same benefit last year as they do this year, the Used total would be showing the Used quantity for all-time time on that item (including last year).
However, the filtering offered in both of those places can help you display only the uses for the desired date range.
Click the Customize Filter (funnel icon) on the Assignments tab.
If you select a date option in the “Used Date Range” Column filter section, it will modify the quantities that display in the Used column to show only those quantities that were used during the selected date range.
To filter out the contacts that haven’t used any during that time frame (Used quantity of '0'), select “Has Used” in the “Benefit Status” drop-down.
I’ve never offered benefits before. Do you have any suggestions for how to get started?
If you haven’t ever tracked benefits before, how you implement your tracking will be based on your business decisions about benefit tracking.
You may wish to consult various industry leaders and articles that would help you develop your business plan about offering memberships with benefits that need to be tracked. We’ve understood that a number of associations have benefited from the information offered by industry thought leaders Kyle Sexton and Frank Kenny.
Get your business plan in place for your offerings and the philosophy of your association in regard to benefit offerings first. Then you can start using GrowthZone to help you assign and track them.
Can a benefit item be changed from Custom to Event Registration or vice versa after it has been assigned?
Yes. When you change a benefit item under Setup, it will update for all those that have it currently assigned.
What happens when someone upgrades or downgrades their membership?
The items that are tied to the current membership will be zeroed out and then the benefits from the new membership will be assigned. If there are adjustments needed you’ll need to manually change those afterwards.
Can event registration benefit items be manually recorded?
Yes. Automatic recording is possible when set up correctly, but you can always manually record the use of event registration as well.
Can I change the email template that displays when sending the email to benefit owners?
The email content that appears is automatically populated by default with suggested verbiage. You can always modify the content on-the-fly at that time. Another option it to create a new email template of your own and select a different one in the Template drop-down whenever you’d like.
Can my staff register on behalf of someone and apply their benefit item discount?
Yes. Staff can use the option to log in as that individual found on the Contacts, Overview tab. Registering for the event from the Info Hub allows you to fully authenticate as that individual without knowing their login and password. This method of registering will grant any appropriate benefit item discounts.

